


















Common pouch seal failure causes include product residue in the seal area, incorrect sealing conditions, film or sealant mismatch, wrinkles, worn or misaligned jaws, pouch geometry, and damage after sealing. Start by recording the failure pattern and checking the product, film lot, machine, and settings before changing one variable at a time. Confirm any adjustment through the appropriate quality checks.
A pallet sits on hold at the co-packer because a few pouches in the case feel soft. A retailer rejects a shipment. A consumer complaint arrives weeks after the run, long after the line moved on to a different product. Seal failures rarely announce themselves at the moment they are created, and that delay is what makes them expensive.
Use this guide to narrow down likely causes, then confirm the finding with your co-packer or quality team. The order of checks may vary by machine, product, and approved quality procedures.
What a Failed Pouch Seal Costs
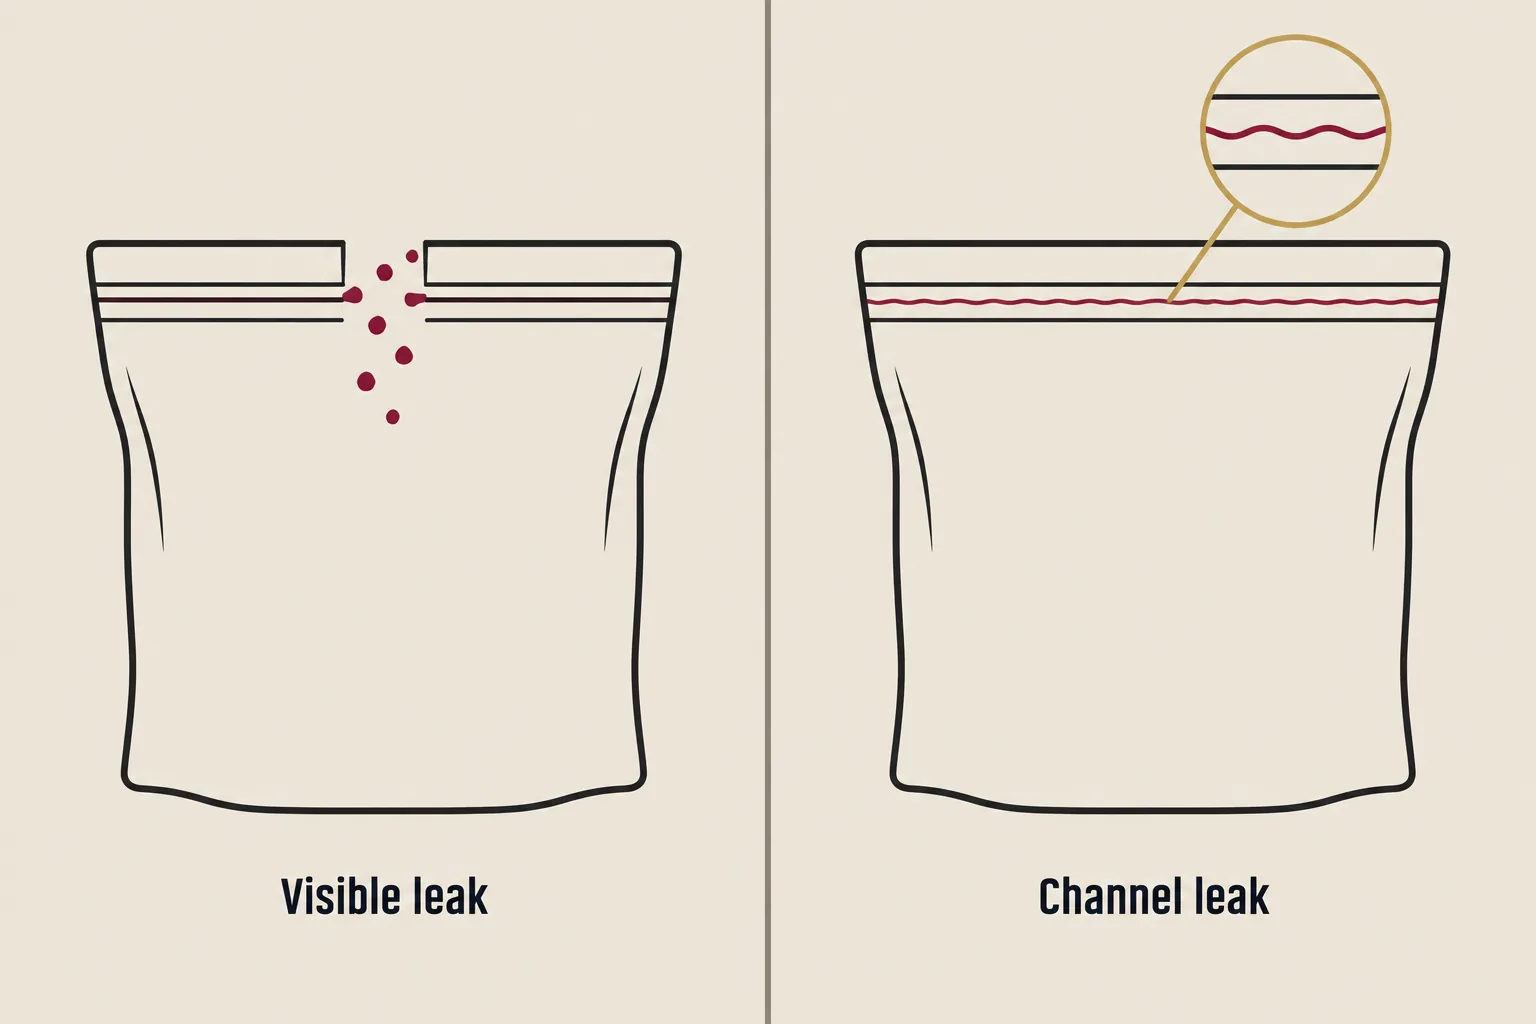
Leakers pulled at the co-packer mean rework labour and scrap. Retail rejections mean a chargeback and a damaged relationship with a buyer who has plenty of alternatives on the shelf. A compromised seal on a high-barrier film shortens shelf life quietly, so the product is still on shelf but no longer performing to its stated date. Each of those outcomes hits margin harder than the price difference between two film structures.
A seal failure may be visible or hidden. A visible failure has an open seal or escaped product and may be caught during production or packing. A channel leak is a narrow path through the seal that can be hard to see; a pouch may pass visual inspection and still leak during distribution.
Because some leaks are discovered after production, record the failure pattern and trace it to the roll, machine, and lot before changing settings.
Failure Patterns and What Each One Tells You
The shape of the defect is the best clue available, and it costs nothing to read it.
| What you see | Most likely cause | First thing to check |
|---|---|---|
| A thin open path running through the seal | Contamination or a wrinkle pulled into the seal | Film surface at the fill point, seal jaws for residue |
| Seal opens with light finger pressure | Not enough heat, pressure, or dwell time | Current settings against the validated setting sheet |
| Seal looks glossy or discoloured and cracks | Too much heat or pressure, sealant squeezed out | Actual jaw surface temperature, not the display |
| Film layers separating while the seal holds | Film structure or lamination adhesion | Roll and lot number, then the specification |
| Failures only at gusset corners or zipper ends | Geometry and thickness transitions | Seal width, jaw condition at that position |
| Same position on every pouch | Jaw wear, a nick, a cold spot, or a roll defect | Jaw surface, heater performance, and roll condition |
A defect that repeats in the same position often points to a localized jaw or pressure issue. Also check the roll and film path, because a film defect can repeat at a fixed position. A defect that moves around may point to contamination or inconsistent film handling.
How a Pouch Seal Is Supposed to Work
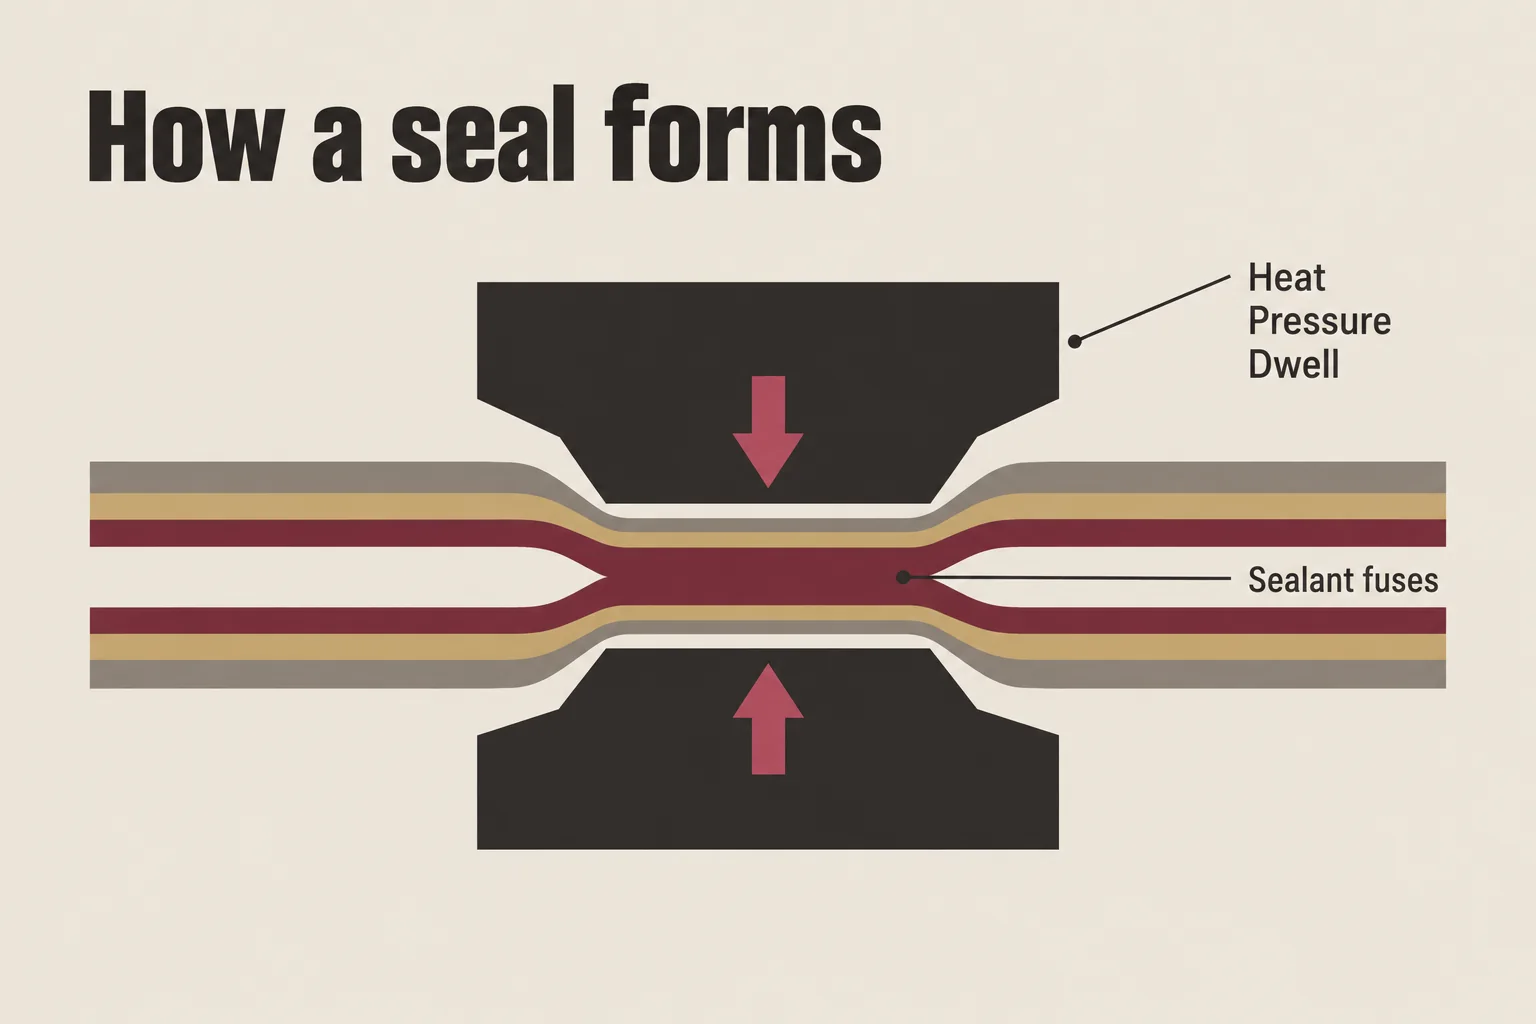
A laminated pouch film is built in layers. The inner layer is a sealant, chosen because it softens and flows at a manageable temperature. The outer layers carry the print, the stiffness, and the barrier that protects the product. When the sealing jaws close, the sealant on one face melts into the sealant on the other and fuses into a single mass as it cools. The outer layers are supposed to stay intact throughout.
Seal formation is affected by three main settings, and their interaction depends on the machine and film:
- Temperature. How hot the jaw face is at the moment of contact.
- Pressure. How hard the jaws squeeze the two film faces together.
- Dwell time. How long the jaws stay closed.
On many machines, increasing line speed reduces the time available to form a seal. That can change seal performance even when the temperature setting stays the same, so confirm how the specific machine controls dwell time.
A fourth factor matters on a running line: hot tack, or the seal’s strength while it is still hot and setting. On a vertical machine, product may load the bottom seal before it reaches full strength. A film that performs well in a bench test can behave differently on a production line, so qualify it with the actual product and intended machine conditions.
Cause 1: Product in the Seal Area
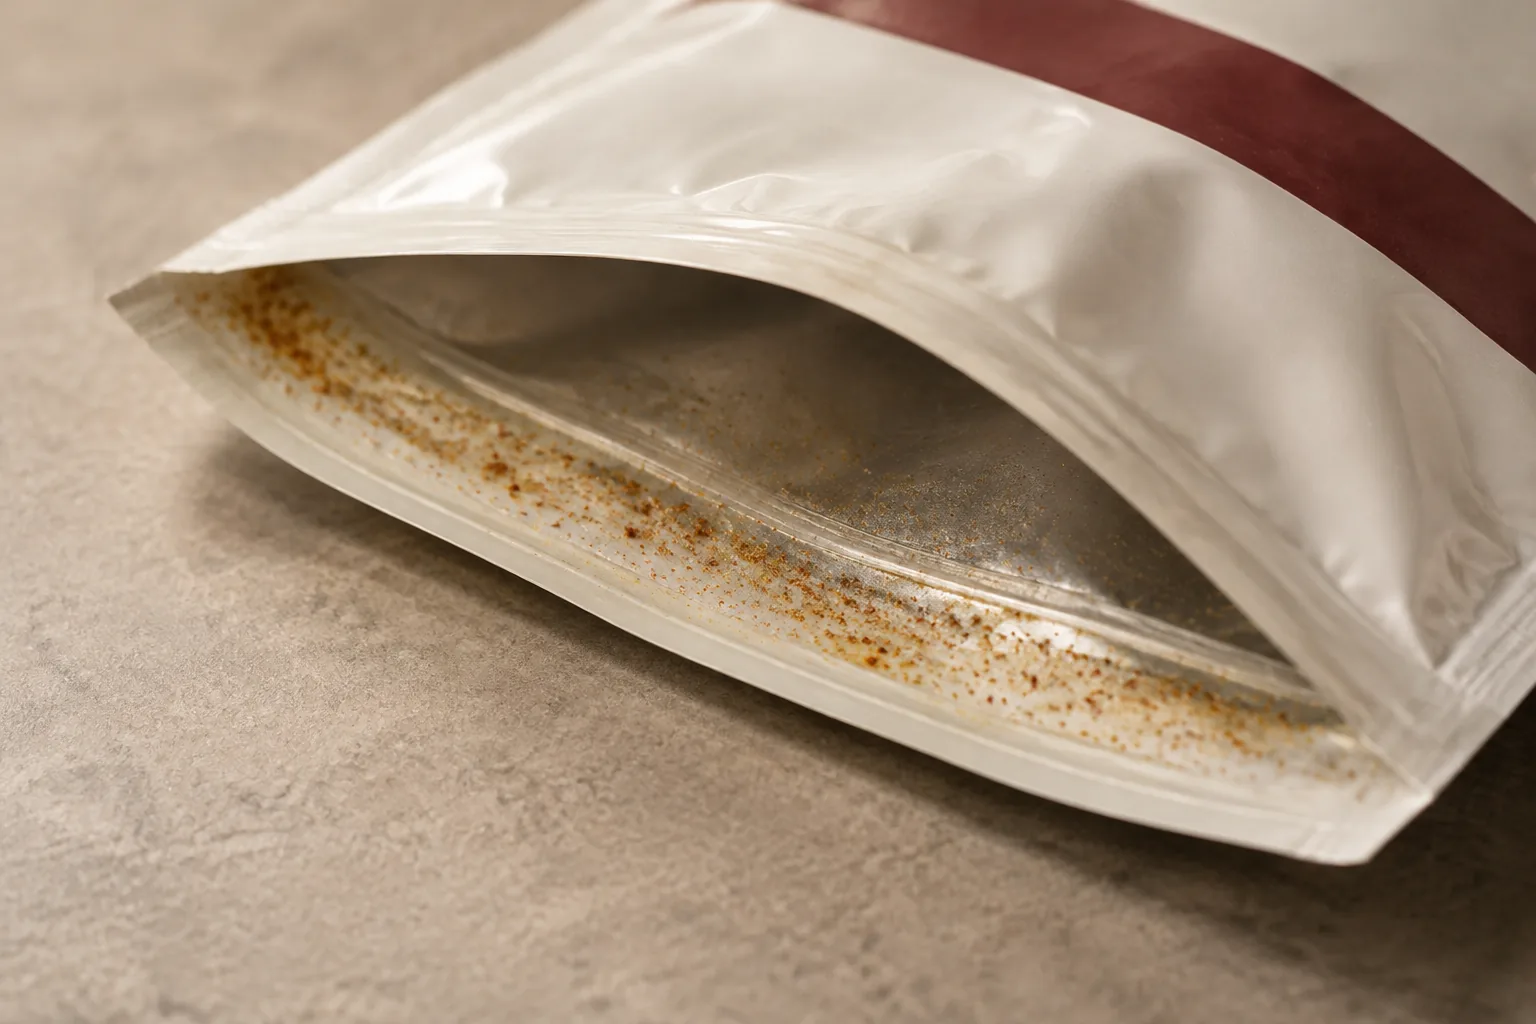
Product residue in the seal area is a common cause of pouch seal failures, particularly in food and beverage production.
Anything that lands on the sealant surface before the jaws close sits between the two faces and stops them from fusing: powder, sugar dust, crumbs, salt, seasoning, and above all, oil.
Snack and bar categories are the worst offenders by nature of the product. Protein and nut bars carry surface oils. Popcorn seasoning is designed to be fine enough to cling, which means it also clings to film. Cookie and brownie production generates crumb and fat together. Powder blends aerate and float, so they reach the seal area even when the fill is accurate.
Oil can be especially difficult to seal through because it spreads along the film and may enter the seal path in a layer too thin to see.
Fixes at the line:
- Give product settling time before the jaws close, even a small amount, so airborne material clears the seal path.
- Check fill timing against jaw timing rather than assuming they are still synchronized.
- Use dust extraction, an air knife, or a blow-off at the seal area.
- Increase seal bar cleaning frequency and build it into the changeover, not into the reaction to a problem.
- Look hard at fill weight. Overfilling is an underrated root cause: it reduces headspace, pushes product up into the seal zone, and puts standing pressure on a seal designed for a lighter load.
Fixes in the material: sealant layers engineered to seal through contamination exist and work well, particularly for oily and dusty products. They carry a cost premium and sometimes a different seal strength profile, so the decision belongs in a specification conversation rather than being made mid-run.
Cause 2: Heat, Pressure, and Dwell Time Out of Balance
Under-sealing produces a seal that peels apart cleanly with light force, often with a dull or incomplete appearance across the seal band. Over-sealing produces the opposite: a seal that looks fused but is thin, brittle, and cracks under flex, because the sealant was pushed out of the seal area and the film was thinned where it matters most.
The instinctive operator response to any weak seal is to raise the temperature. When the real problem is contamination or insufficient dwell, raising temperature converts a weak seal into a burnt one and adds a second defect on top of the first.
Verify these before adjusting anything:
- Displayed temperature versus actual jaw surface temperature. Thermocouple placement, heater band condition, and calibration drift all put a gap between the number on the screen and the heat the film receives. A surface temperature check on the jaw face settles the argument in minutes.
- Heat distribution across the jaw. A cold spot produces failures in the same position on every pouch. If the defect map is consistent, start here.
- Pressure. Plant air pressure drifts; jaw closing force goes uneven as mechanisms wear, springs fatigue. Uneven pressure gives a seal that is strong at one end and weak at the other.
- Line speed history. Ask what the speed was last week. A throughput increase made for good reasons quietly cut dwell time.
The durable answer is a validated setting sheet for each film structure and pouch size, kept at the machine, used at every startup, and updated only through a deliberate change. Settings that live in an experienced operator’s memory leave the plant when that operator takes a holiday.
Cause 3: The Wrong Film Structure for the Product or the Machine
Every sealant has a sealing window: the range of temperature and pressure within which it produces a sound seal. A wide window is forgiving of normal line variation. A narrow window means a small drift, the kind that happens every day, lands outside the range and produces failures.
Structure and equipment have to match. A film specified around one machine type can behave very differently on another co-packer’s equipment, with different jaw geometry, different heat delivery, and different film path tension. Our co-manufacturer partnership support can help coordinate packaging requirements with a customer’s production partners. If production moved between sites and seal failures started, that sequence is the finding.
Thickness and stiffness matter in both directions. A film too stiff will not lie flat at the seal and traps wrinkles. Review the structure with your packaging supplier; we describe its sourcing and brokering service as supplier coordination across packaging needs. A film too thin will not tolerate the jaw pressure it is given.
Barrier performance and sealing are not separate subjects. The seal is part of the barrier. A premium high-barrier structure protecting a sensitive product does nothing useful if the seal leaks, so paying for barrier while accepting a marginal sealing window is a poor trade.
Different recyclable and mono-material structures can have different sealing windows and heat tolerances. Qualify each new structure on the intended machine with the actual product before production; do not assume settings from another film will transfer. Our flexible films and pouches are part of our broader packaging offer.
One more point on specification: a change made to save a fraction of a cent per pouch can create a scrap and downtime problem that costs many times the saving. Unit price is one line in the calculation. Total cost includes scrap, rework, line downtime, late shipments, and the rejected load.
Cause 4: Machine Wear, Setup, and Maintenance
Seal jaws are consumable. They nick, they wear, they build up residue, and each of those conditions leaves a repeating signature in the same place on every pouch. That repeatability is the diagnostic gift: if the defect never moves, stop adjusting settings and inspect the jaw face.
Put these on a schedule rather than leaving them to reaction:
- Jaw alignment and parallelism. When jaws close out of parallel, seal strength is strong on one side and weak on the other. Easy to measure, easy to miss.
- Jaw covering condition. Worn or damaged covering material delivers heat unevenly across the seal band.
- Film tracking and tension. Web wander, slack, and registration drift all pull wrinkles into the seal path. A wrinkle is a guaranteed channel leak.
- Seal jaw cleaning intervals, tied to product type rather than to a generic schedule. Oily products need it far more often.
If production runs at a co-packer, three questions before a run save a lot of argument afterwards: which machine is the product running on, what condition are the jaws in, and when were the settings for this specific film last validated?
Cause 5: Pouch Design and Geometry
Some failures are designed in before a single pouch is made.
Gusset corners are a common risk point on a stand-up pouch. Several layers of film converge at one spot, so the seal must bridge a sudden step in thickness while the flat areas beside it need much less heat. Settings that suit the flat seal are often marginal at the corner.
Zipper and slider ends create the same problem: a thickness transition where the seal has to close around a step. Failures clustered at zipper ends are geometry talking, not machine settings.
Tear notches and laser scores placed too close to the seal give a crack somewhere to start. A notch that makes the pouch easy to open can also make it easy to open accidentally in a case.
Spouts and fitments on beverage pouches create a separate seal interface with its own failure modes. Assess that interface separately from the pouch body seal.
Seal width is the quietest lever available. A wider seal band buys tolerance for the normal variation every line has. It uses slightly more film, and it is a decision most brands never get asked about.
Shelf appearance and seal reliability do pull against each other sometimes: a clean minimal seal looks better and performs worse. Both can usually be satisfied, but only if the conversation happens at the design stage rather than after the first production run.
Cause 6: What the Product Does to the Seal
A seal can be sound at the moment of production and compromised months later.
- High fat and oil content. Fats and oils are the usual suspects when a seal that passed at fill weakens over shelf life. Bars, nut products, and anything fried deserve shelf-life hold testing with the real product, not just a day-one pass.
- Hot fill and warm product. Filling warm softens the seal before it has set. Bakery items and warm-packed products need the cooling profile checked, not just the sealing settings.
- Sharp or hard product. Granola clusters, whole nuts, and chips abrade and occasionally puncture film near the seal, particularly during case packing and transport vibration.
- Product compatibility. Depending on the product, acids, flavour oils, or botanical extracts may affect packaging materials over time. Check compatibility with the film supplier using the actual product and intended storage conditions.
- Pressure on the seal. Nitrogen flush and product off-gassing put constant standing load on the seal for the life of the pouch. A seal only has to fail once under that load.
Seal trials should use the actual product, not a stand-in with a similar weight. A substitute may not reproduce the product’s residue, shape, temperature, or interaction with the film.
Cause 7: Damage After the Seal Was Made
If the seal was verified good at the machine and failed later, that is a different problem with a different fix, and treating it as a sealing problem wastes weeks.
Distribution stresses to account for:
- Case packing and drop impact. How the pouch lands in the case and how the case is handled.
- Compression. Stacked pallets put steady load on the bottom layers for days.
- Pressure and temperature changes in transit. Trapped gas inside a pouch responds to both. Air freight and mountain lanes are where teams most often see seals stressed in transit, and trailers crossing Canada and the United States see wide temperature swings between seasons, including freeze and thaw cycles.
- Warehouse conditions at either end of the lane.
The practical response is structural. Case count, corrugated tray support, and how a PDQ display holds product are as much about seal protection as presentation. Coordinate shipment timing and inventory questions with the logistics and fulfillment team. A shelf-ready tray that keeps pouches from shifting and helps manage compression can reduce damage that a sealing adjustment cannot address. This is why the secondary packaging decision and the pouch decision benefit from being made together rather than by separate vendors on separate timelines.
Cause 8: Film Storage and Handling Before the Machine
Film arrives on a roll, and what happens to that roll matters.
- Roll damage. Crushed cores, dented edges, and telescoping produce failures at a fixed position across the web. If the defect sits at a consistent distance from the film edge, inspect the roll.
- Moisture and condensation. A roll moved from cold storage into a warm plant will condense moisture on the outer wraps. Sealing through condensation does not work.
- Acclimation. Rolls need time to reach plant temperature before running. Skipping it is a reliable way to produce a bad first hour and then spend that hour adjusting settings that were never the problem.
- Age and storage conditions. Sealant performance is not indefinite, and storage conditions affect it.
- Lot traceability. Being able to tie a defect back to a specific roll and production lot is the difference between a targeted investigation and a guess. That traceability has to exist before the problem, not be assembled afterwards.
A short incoming inspection habit, checking roll condition, edges, core, and paperwork against the specification, catches problems while they are still an inconvenience rather than scrap.
A Step-by-Step Way to Diagnose a Seal Failure
When a line is down, or product is on hold, the temptation is to change several things at once. Resist it.
Changing one variable at a time is slower for ten minutes and faster for the rest of the day.
1. Contain and record. Quarantine affected product. Write down lot codes, roll numbers, time codes, machine, lane, and current settings before anyone adjusts anything. Retain samples of both good and failed pouches. 2. Define the pattern. Ask whether every pouch or only some are affected, whether one lane or all lanes are involved, and whether the defect appears in one position or randomly. The pattern can suggest where to start, but it does not prove the cause. 3. Check the film and contamination. Inspect the seal path for product residue, the roll for damage, and the web for wrinkles. These checks can help identify common causes before settings are changed. 4. Verify settings against the validated setting sheet, not against memory or against what the display said this morning. 5. Check the jaws. Surface condition, alignment, parallelism, and actual measured temperature at several points across the face. 6. Run a controlled trial. Change one variable, produce a set of samples, test them, record the result. Then the next variable. 7. Escalate to a film structure review only after contamination and machine condition are genuinely ruled out. Structure changes take time and should not be the first response to a problem a cleaning cycle would have solved.
Quality and product hold
If package integrity or food safety may be affected, follow the product-hold, investigation, and release procedures set by your quality team and co-packer. Do not release product based on appearance, a squeeze check, or this guide alone.
Tests That Confirm Whether a Seal Is Sound
Visual inspection can identify open seals and visible defects, but it does not measure seal strength or rule out every leak. Choose a test based on the package, product, and question the quality team needs to answer.
- Seal-strength testing: ASTM F88/F88M measures the force needed to separate a seal specimen and records how it fails. It evaluates seal strength; it is not, by itself, a leak test.
- Burst testing: ASTM F1140/F1140M measures a package’s resistance to internal pressurization. Its result does not necessarily correlate with seal strength measured using F88.
- Bubble-emission testing: ASTM D3078 uses a vacuum chamber to detect gross leaks in flexible packages with headspace gas. Small leaks may not be detected, and results depend on the product, package, and test conditions.
- Dye-penetration testing: ASTM F3039 describes dye testing for leaks in nonporous packaging or flexible barrier materials. Use it only where the package and test purpose fit the method.
A water bath, vacuum chamber, or squeeze check should be part of a documented quality plan, not treated as a universal test or a substitute for validated acceptance criteria. Set sampling frequency with the responsible quality team, record results, and retain samples according to the facility’s procedures.
Ask the film supplier or packaging partner for the applicable structure specification and available supporting documentation. Retained samples and recorded test results can help the brand and co-packer investigate a complaint using the same evidence.
Preventing Seal Failures Before the Next Run
Most seal problems are prevented at specification and qualification, not at the machine.
- A written, agreed specification. Structure, thickness, sealant layer, roll width, core size, surface treatment, and tolerances. If it is not written down, it will drift.
- A qualification run with real product on the actual machine, at real line speed, before a full production commitment. Bench samples are a starting point, not an approval.
- Documented setting sheets per film and pouch size, kept at the machine, reviewed after any change.
- Alignment between the brand, the film supplier, and the co-packer. Equipment requirements should be a shared document, not something each party assumes the others have handled.
- Change control. A film change, a formula change, a fill weight change, or a new co-packer should each trigger a fresh seal validation. Formula changes are the one that catches people, because nobody thinks of a recipe adjustment as a packaging event.
- Consistency of supply. Substituting a different structure mid-year because of an availability gap reintroduces every variable in this article at once. Predictable supply of the same validated structure is a seal-quality issue, not only a procurement one.
A note on timing: February through April is typically a quieter stretch for food and beverage production. That window is the right time to run a seal trial, qualify a new structure, or test a design change, while the line has room and nobody is diagnosing a problem against a shipping deadline.
Film Problem or Machine Problem
Use the pattern to decide what to investigate next. These are clues, not proof of a single cause.
Related readingJerky and Meat Snack Packaging Built for Oxygen ControlRead the guide →| Pattern | What to check |
|---|---|
| Follows one roll or lot, or appears on more than one machine | Film specification, roll condition, and lot records |
| Follows one machine, lane, or repeatable jaw position | Jaw condition, alignment, temperature distribution, and pressure |
| Begins after a recipe, fill-weight, or speed change | Product residue, headspace, fill timing, and validated machine settings |
If the cause is still unclear, compare retained samples and production records with the co-packer and film supplier. A packaging partner that coordinates multiple formats may also help keep specification and secondary-packaging questions in one conversation.
How Armour Rose Approaches Seal Problems
Armour Rose is a custom packaging sourcing partner that works through manufacturing partners. For a seal investigation, its role can include reviewing packaging requirements and coordinating relevant supplier information; machine diagnosis and product-release decisions remain with the customer’s production and quality teams.
The process starts with discovery: current packaging, product characteristics, co-packer equipment, volumes, order frequency, and delivery points. Armour Rose then reviews gaps and discusses specification options with the customer before an order is placed.
We can source printed films and pouches alongside cartons, corrugated packaging, displays, and labels through one customer relationship. Reviewing secondary packaging with the pouch can help teams consider both the seal and the distribution conditions. This model uses a network of manufacturing partners rather than relying on one production line.
A packaging review can consider total cost, including scrap, rework, downtime, held inventory, and rejected shipments, alongside the price per pouch. Armour Rose states that it has more than 25 years of packaging experience and works with food and beverage brands in Canada and the United States.
If pouches are leaking or a new structure needs qualification, contact us to discuss a packaging review. Bring available lot codes, retained samples, and current settings so the team can understand the issue and coordinate the next step with the relevant production partners.